I’ve been playing with Elixir off and on over the past couple of months
and wanted a way to run some things using Elixir on my Raspberry Pi.
Sadly, there aren’t any packages for Elixir that are up to date and work
on the Raspberry Pi. Due to the lack of packages, I compiled it from
source. Here’s how I did it. I have both an original Raspberry Pi and a
Raspberry Pi 2 and the instructions below will work with both. We’ll
assume you’re the pi user on your Raspberry Pi and that you can run
commands as root using sudo.
We’ve got to start off building Erlang first, because the packages for
Raspbian Jesse are too old to support Elixir 1.2
1. Install the necessary packages so we can build Erlang:
2. Download and extract the Erlang 18.2.1 release from erlang.org:
curl -O http://erlang.org/download/otp_src_18.2.1.tar.gz
tar xf otp_src_18.2.1.tar.gz
3. Compile all the Erlang bits. We’ll install Erlang into
/opt/erlang/18.2.1 which is just an arbitrary choice.
cd otp_src_18.2.1
./configure --prefix=/opt/erlang/18.2.1
make
sudo make install
Erlang’s install
documentation
is an excellent resource if you want to dig more into how to build and
install Erlang. For example, they recommend building and running the
smoke tests for the compiler, but I’ve chosen not to do that here. The
above commands come from their docs and do the following:
Go into the source directory
Set up a shell variable we’ll use a few steps later
Build Erlang
Install the Erlang compiler and runtime into our chosen location.
Now that we have Erlang compiled and installed, it’s time to install
Elixir. Fortunately, this process is much easier and much quicker.
1. Download the precompiled release for the Elixir version we want.
2. Create the path we’re going to install Elixir into
sudo mkdir-p /opt/elixir/1.2.3
3. Extract the Elixir release into its path
sudo unzip Precompiled.zip -d /opt/elixir/1.2.3
The last bit to get everything set up is to add both
/opt/erlang/18.2.1/bin and /opt/elixir/1.2.3/bin to your $PATH. In
my case, I just chose to hack /etc/profile directly. Due to the myriad
of ways this can be accomplished, I’m leaving this as an exercise to the
user.
Super huge thanks to @wtfleming for their
post
about doing embedded work on a Raspberry Pi with Elixir. I took a lot of
what they wrote and extracted and built upon it while writing this post.
I’m a long time Vim user and have been playing with Atom in my spare time. One of the features that I liked about Tim Pope’s vim-rails plugin is the file navigation. There’s a couple of plugins for Atom that will do this, but sadly, none of them appear to have been updated for the Atom 1.0 API. So, I decided to fix that, and document the process here, just in case anybody else can benefit from this. For these blog posts, I’ll be updating the rails-navigation plugin. I’m also assuming that you’re on either OS X or Linux while working through these posts. Let’s keep going!
If you haven’t yet read it and you’re new to Atom package development, I think you would benefit from reading part one
Step One: Fix the Stylesheet locations
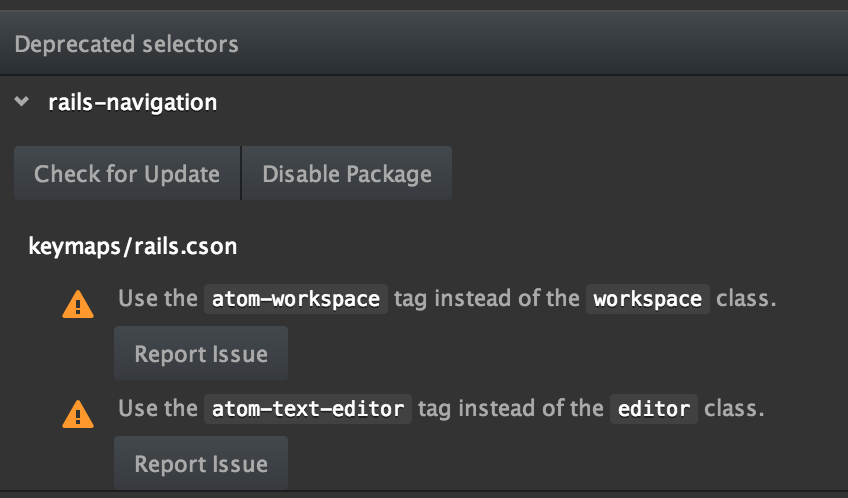
The first warning we’ll tackle from the deprecation warning list is the warning about the stylesheet location:
Atom 1.0 moves the styles from the the stylesheets folder in the package to the styles directory. We’ll follow suit in the package and a simple git mv stylesheets styles does the trick for that deprecation warning. At the same time, we’ve removed the comment and the import of ui-variables from the top of rails.less since that’s a pattern that no longer applies when creating stylesheets for Atom plugins
Step Two: Fix the Keymap
The second warning we’ll fix is the one about deprecated selectors being used in the keymap:
Similar to the last error, we just need to make a few text updates. One search and replace in the keymap.cson file in the package to change .editor to .atom-text-editor and another one to replace workspace with atom-workspace and this deprecation warning is eliminated as well.
Step Three: Fix the package activation events
The third warning we’ll fix is about what triggers the activation of the package. Atom delays activation of a package until a set of events specified by the package developer are triggered. Before Atom 1.0, the key for this in the package.json file was activationEvents. Now it’s activationCommands and the format has changed slightly.
All the events for the rails-navigation package are editor events, meaning that we can keep the same array of events and just nest them in the atom-text-editor selector:
After that update, we’re down to one more deprecation warning to remove
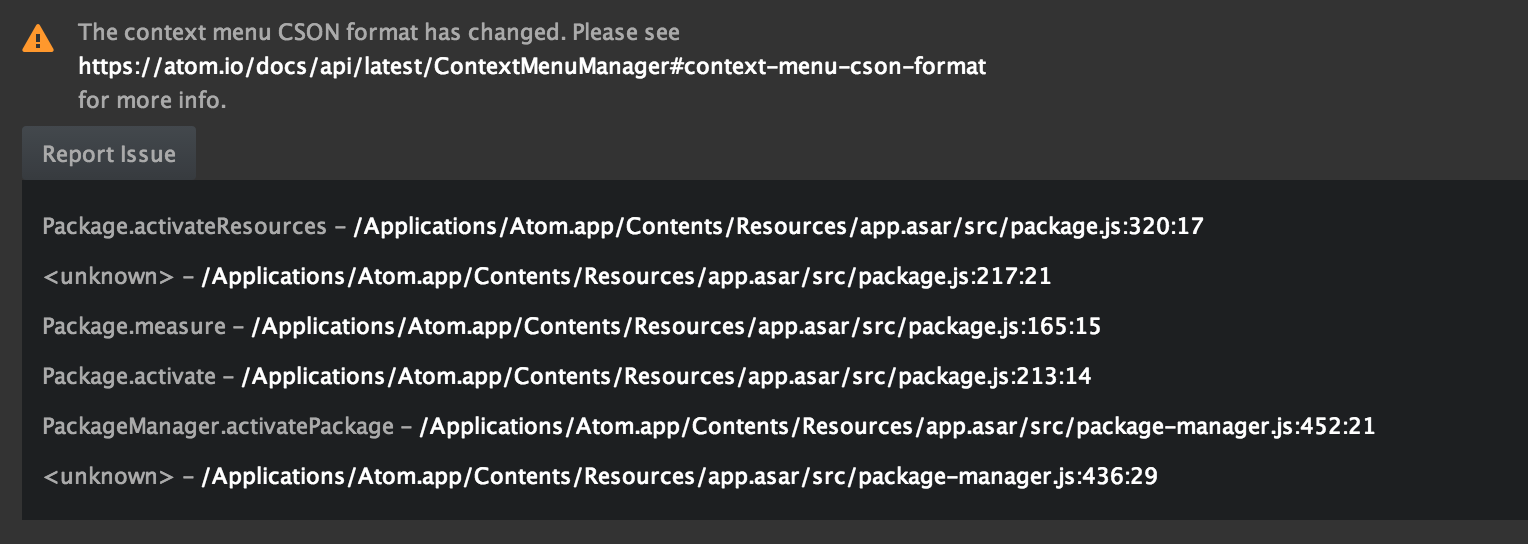
Step Four: Updating the context menu
Last, but certainly not least, we need to update the context menu format. The format appears to have completely changed over to be more consistent with other places in the application and it’s also more explicit.
Fortunately, rails-navigation only has one menu item, so the change was pretty simple and the new context menu CSON looks like this:
We’ve gotten the deprecation warnings that Atom tells us about when we load up our package removed. The complete set of changes in this post have been pushed to my fork on GitHub if you want to take a look. Thanks for reading! See you next time!
I’m a long time Vim user and have been playing with Atom in my spare time. One of the features that I liked about Tim Pope’s vim-rails plugin is the file navigation. There’s a couple of plugins for Atom that will do this, but sadly, none of them appear to have been updated for the Atom 1.0 API. So, I decided to fix that, and document the process here, just in case anybody else can benefit from this. For these blog posts, I’ll be updating the rails-navigation plugin. I’m also assuming that you’re on either OS X or Linux while working through these posts. Let’s get started!
The Atom docs suggest using the package generator to generate a package for you and start from there. Since we’ve got an existing package, that method won’t work for us. However, getting our newly cloned package loading into Atom is still pretty straightforward. Atom loads any package that’s in $HOME/.atom/packages on startup, which means that we can symlink our local codebase into $HOME/.atom/packages and Atom will load it for us.
Seeing where we’re at
The final step for part one of this guide is to figure out what issues we’re facing with the package. Under View -> Developer, there’s a menu item Open in Dev Mode.... Since I’ve been writing this post in Atom, I chose to use this option to give me an Atom window that’s in dev mode so that I don’t mess with the window that I’m using to get real work done.
Next thing is to run some specs. Sadly, the first time I did this, they failed to run because I failed to account for the dependencies that this package has on packages in NPM. A simple npm install in the package directory and the specs are all running again. However, they fail due to the removal of deprecated classes, so we’ll be taking care of that soon.
Outro
Now that we have thing set up, and we’ve gotten the specs run and our dependency issues worked out, let’s take a short break, and then we’ll get to fixing those deprecations the deprecation cop told us about.
Hi there! I’m excited to announce that Janky 0.11 is out! The highlight
of this release is support for Slack, thanks to Mathias Bartmann!
We’ve also converted the Room IDs from integers to strings in order to
improve chat room support, so you’ll want to make sure you follow the
upgrade instructions in the
README.
This release also marks my first as Janky’s maintainer after taking over
the project earlier in the year. Thanks to the folks at GitHub for the
support in my taking over their project.
Use Ctrl+R to paste things from registers into the command line.
I use the fugitive plugin to deal with Git on a daily basis and I had
recently run into several instances where I needed to delete files that
were showing up in the output of git status. Normally, I would use OS
X’s copy and paste to handle this, but the other day I finally got fed
up and looked for a different way.
Enter Ctrl+R. Since I was typing on Vim’s command line, I went
skimming through the help (:help cmdline-editing) where I found what I
was looking for: The ability to copy and paste from Vim registers into
the command line.
So, if you need to copy and paste in Vim either on the command line you
can do it with Ctrl+R and then the register name. For example, if you
copy some paste using y$ (copy from the current cursor position to the
end of the line), you can then paste it in the command line or in insert
mode by typing Ctrl+R followed by ". Any other valid registers you
may have text in can be used in place of ".
Earlier today, I also found out that Ctrl+R also works this way in
insert mode as well, thanks to this
answer
from this
question on StackOverflow.